winform项目——仿QQ即时通讯程序08:聊天窗体和验证消息窗体

编程项目2019/12/16 18:48:43阅读:908

上一篇文章我们完成了查找好友、添加好友窗体,本篇文章将完成最后两个窗体:聊天窗体、验证消息窗体。

首先看看聊天窗体,界面非常简单,如下图:
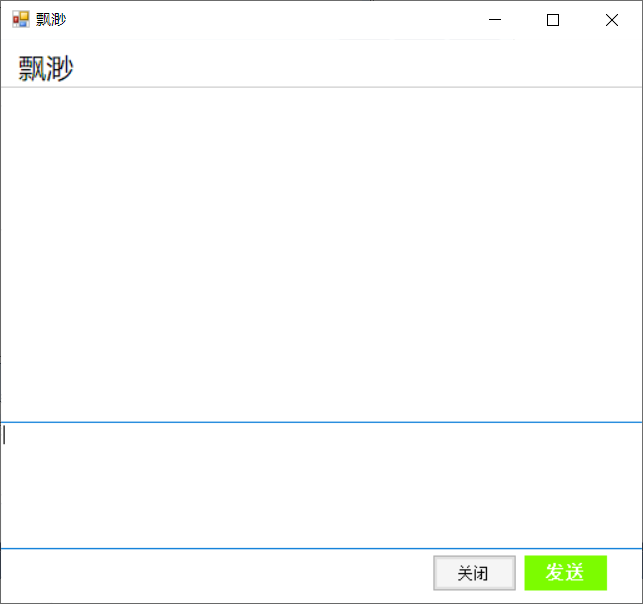
聊天窗体

首先左上角有一个label用于显示聊天好友的昵称,往下是一个TextBox,多行的,把它设置为只读或者禁用,然后背景色改成白色。再往下是输入框,也是一个TextBox,然后右下角是两个按钮,非常简单就能搭建完成。至于他们的Anchor属性,由读者自行完成。

验证消息窗体

验证消息窗体如下图,咋一看啥都没有。
验证消息设计

它上面只有一个FlowLayoutPanel控件,设置为在父容器中停靠。其它控件全部都是由代码动态加载出来的。先看一下效果图。
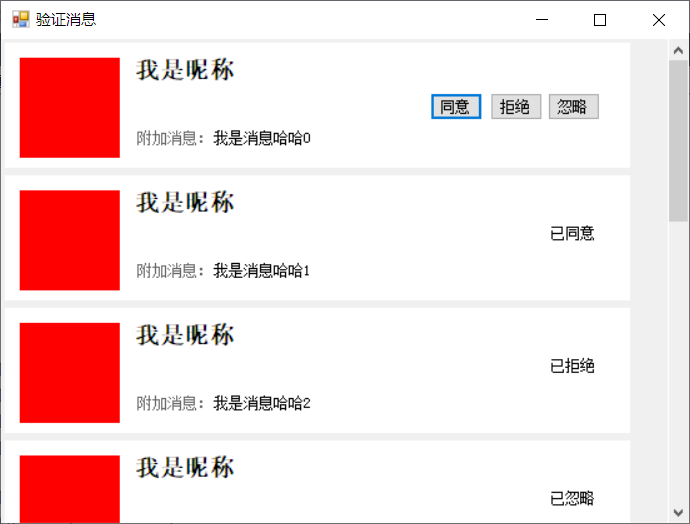
效果图

和之前动态生成会话列表类似,不多说,直接贴代码:

public void add_panel(string account, string msg, int state)
{


Panel separate_panel = new Panel();
separate_panel.Name = "separate_panel" + account.ToString();
separate_panel.Size = new System.Drawing.Size(500, 100);
separate_panel.BackColor = Color.White;


Label hide_lbl = new Label();
hide_lbl.Name = "1234567890";
hide_lbl.Visible = false;


PictureBox head_pic = new PictureBox();
head_pic.Location = new System.Drawing.Point(12, 12);
head_pic.Name = "head_pic";
head_pic.Size = new System.Drawing.Size(80, 80);
head_pic.BackColor = Color.Red;


Label nickname_lbl = new Label();
nickname_lbl.Location = new System.Drawing.Point(100, 12);
nickname_lbl.AutoSize = true;
nickname_lbl.Font = new System.Drawing.Font("宋体", 13.8F, System.Drawing.FontStyle.Bold, System.Drawing.GraphicsUnit.Point, ((byte)(134)));
nickname_lbl.Name = "nickname_lbl";
nickname_lbl.Size = new System.Drawing.Size(60, 24);
nickname_lbl.Text = "我是昵称";


Label label7 = new Label();
label7.AutoSize = true;
label7.ForeColor = System.Drawing.SystemColors.ControlDarkDark;
label7.Size = new System.Drawing.Size(82, 15);
label7.Location = new System.Drawing.Point(104, 70);
label7.Text = "附加消息:";


Label appendmsg_lbl = new Label();
appendmsg_lbl.AutoSize = true;
appendmsg_lbl.Name = "appendmsg_lbl";
appendmsg_lbl.Size = new System.Drawing.Size(112, 15);
appendmsg_lbl.Location = new System.Drawing.Point(165, 70);
appendmsg_lbl.Text = msg;


Button agree_btn = new Button();
agree_btn.Location = new System.Drawing.Point(340, 40);
agree_btn.Name = "agree_btn" + account.ToString();//后面截取字符串获取对方账号
agree_btn.Size = new System.Drawing.Size(42, 22);
agree_btn.TabIndex = 8;
agree_btn.Text = "同意";
agree_btn.UseVisualStyleBackColor = true;
agree_btn.MouseClick += Agree_btn_MouseClick;


Button disagree_btn = new Button();
disagree_btn.Location = new System.Drawing.Point(388, 40);
disagree_btn.Name = "disagree_btn" + account.ToString();
disagree_btn.Size = new System.Drawing.Size(42, 22);
disagree_btn.TabIndex = 9;
disagree_btn.Text = "拒绝";
disagree_btn.UseVisualStyleBackColor = true;
disagree_btn.MouseClick += Disagree_btn_MouseClick;


Button ignore_btn = new Button();
ignore_btn.Location = new System.Drawing.Point(434, 40);
ignore_btn.Name = "ignore_btn" + account.ToString();
ignore_btn.Size = new System.Drawing.Size(42, 22);
ignore_btn.TabIndex = 10;
ignore_btn.Text = "忽略";
ignore_btn.UseVisualStyleBackColor = true;
ignore_btn.MouseClick += Ignore_btn_MouseClick;


Label state_lbl = new Label();
state_lbl.Location = new System.Drawing.Point(434, 40);
state_lbl.Name = "state_lbl";
state_lbl.AutoSize = true;
state_lbl.Size = new System.Drawing.Size(42, 22);
state_lbl.Text = "萌萌哒";
state_lbl.Visible = false;


separate_panel.Controls.Add(ignore_btn);
separate_panel.Controls.Add(disagree_btn);
separate_panel.Controls.Add(agree_btn);
separate_panel.Controls.Add(appendmsg_lbl);
separate_panel.Controls.Add(label7);
separate_panel.Controls.Add(nickname_lbl);
separate_panel.Controls.Add(head_pic);
separate_panel.Controls.Add(state_lbl);


if (state == 1)
{
state_lbl.Visible = true;
agree_btn.Visible = false;
disagree_btn.Visible = false;
ignore_btn.Visible = false;
state_lbl.Text = "已同意";
}
else if (state == 2)
{
state_lbl.Visible = true;
agree_btn.Visible = false;
disagree_btn.Visible = false;
ignore_btn.Visible = false;
state_lbl.Text = "已拒绝";
}
else if (state == 3)
{
state_lbl.Visible = true;
agree_btn.Visible = false;
disagree_btn.Visible = false;
ignore_btn.Visible = false;
state_lbl.Text = "已忽略";
}


flowLayoutPanel1.Controls.Add(separate_panel);
}

这个方法就是动态生成一条验证消息面板的方法,里面的三个按钮已经注册了点击事件,如下:

private void Ignore_btn_MouseClick(object sender, MouseEventArgs e)
{
Control.ControlCollection cc = ((Button)sender).Parent.Controls;
foreach (Control c in cc)
{
if(c is Button)
{
c.Visible = false;
}
if(c is Label)
{
if(c.Name == "state_lbl")
{
c.Text = "已忽略";
c.Visible = true;
}
}
}
}

其余两个就不贴了,就是把c的Text属性改成“已拒绝”和“已同意”即可。这个时候可以运行看一下效果,在窗体的load事件中添加十个验证消息进行测试:

for (int i = 0; i < 10; i++)
{
add_panel(i.ToString(), "我是消息哈哈" + i, 0);
}

结语:CIM项目的窗体设计阶段就算是完成了,关于美化的问题我们后面再做。那么从下一篇文章开始,就正式进入CIM项目的业务逻辑。当然,服务端程序还没做,在分析业务逻辑的过程中再做,原理懂了才能进行服务端的程序的制作。

本文系小博客网站原创,转载请注明文章链接地址